
We always collected black walnuts as a kid and they are my favorite nut for cooking and snacking. Please don’t get them confused with English walnuts… totally different! Black walnuts are HARD to crack! But there is a method to the madness if you’ve been around hill folk in the Appalachians and learned how to do it. I also just have to say that fresh cracked walnuts taste so much better than anything you are gonna find in a grocery store. They are totally worth the effort!
It’s actually funny because as I’m out collecting my black walnuts, it never fails that someone driving by stops and asks what I’m doing and how I do it, and how to get the nuts out of those shells! So here we go! A how to on black walnuts!
First you have to collect the walnuts! They have a green husk and may be turning brown or black and mushy. To collect walnuts you need rubber gloves, old clothes, and a big bucket. Because black walnut hulls are used for dye and wood stain if you are not careful your hands and clothes will become stained brown. Almost impossible to get the stain out once you have touched them. Also wear rubber boot! You don’t want to wear your boots inside after collecting or hulling walnuts because you will have lovely stained foot prints on your floors and carpets if you do. Even if you rinse your boots off… trust me! Leave them outside afterwards!
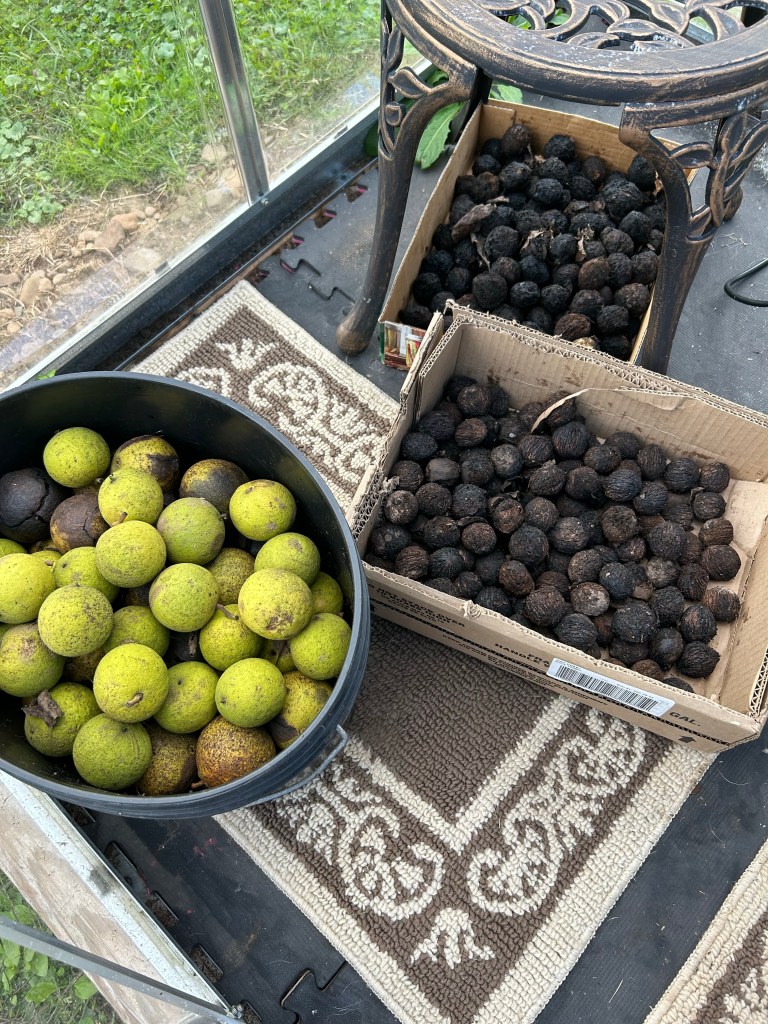
I do have videos if you want to follow along. After collecting your green walnuts leave them in the bucket for several days till they start to turn brown/black and squishy. Place the bucket somewhere squirrels cannot get to them because squirrels can smell walnuts miles away and you will come back to an empty bucket! Once they have turned colors to brown/black/and squishy (the hulls are starting to decompose making it easier to hull the nut) we can start the hulling process.
You will need rubber gloves, old clothes, rubber boots, a scrap piece of plywood, and old tarp, and a box to put your hulled nuts into afterwards (I like to use the box canning jars come in and don’t pile them up to dry or they will mold!) . In the videos I am going to rinse this batch because I want to plant some to get walnut saplings. But normally I don’t bother with rinsing them. Rinsing just allows any bad nuts to float to the top and you can cull those out of the batch easier.
Here is the video on how to hull the walnuts. It’s very simple! you may see some white worms in the hulls. That’s perfectly normal and just mother natures way of decomposing the hull. Don’t worry about them too much. Once you start to rinse or air dry them the worms will die and go away. They are not inside the nut itself! Just the hull part.
I split the how to videos into short segments. This next one is rinsing and how to dry them. Remember you need a squirrel proof place or your walnuts will quickly disappear! To use the hulls as dye for yarn or wool or clothing you must use a mordant first. I use vinegar. This makes it dye fast otherwise the dye will not stay long (it will wash out over time). For wood stain use as is and more coats means a darker color. It makes a fabulous wood dye!
The final video is prepping some of the walnuts to winter over (stratification) so they can sprout and get some baby walnut tree saplings started. I’m experimenting with this method as most people put the zip lock bag in the fridge for the winter and plant in the spring. I want to try a little different method. Just to see if it will work 🙂
There are plenty of videos online on how to crack the walnuts once they have been hulled and dried. When I was a kid we would put them on an anvil and hit them with a hammer, nut picks are helpful. Native Americans would use two rocks: one to lay the nut on and one to hammer with. Black walnuts are very hard and would eventually wear a hole into the bottom rock and often museums will have what is called a “nutting stone” in their Native American displays. You can also purchase a heavy duty black walnut cracker on Amazon. A tad bit pricy but if you plan on cracking a bunch of them it does make things somewhat easier. There are tons of DIY black walnut cracker videos online made out of scrap bits and bobs but I’m not that mechanically inclined! So honestly a flat’ish rock and a hammer is a beginners best bet. Another helpful tool is wire cutters. You can use those to help snip the nuts out from the center portion once you crack the walnut in half. This gives you larger pieces and is easier to use sometimes than nut picks.
So for the folks that always seem to stop and ask “wacha doin” as I’m walnut collecting… now you know! Just remember not to eat too many walnuts in one sitting/day or you may be visiting the bathroom a lot as too many can have a laxative effect! Maybe that’s why they are so hard to crack lol so we don’t over indulge ourselves lol they also have some great health benefits (you can google those)!
I particularly like black walnuts crumbled on top of oatmeal in the winter for a nice warm breakfast! They keep well frozen once cracked, so you can crack them and put the nuts in quart sized freezer bags. As needed, you can get the freezer bags out and dump them into a quart canning jar for easier access. One lady near us sells cracked walnuts by the quart bags to earn a bit of extra Christmas shopping money. I won’t fib! I bought every single bag she had (at $20 a quart sized bag) last year and doled them out judiciously all year long lol. They were my special treat! When I was a kid many people sold cracked/shelled walnuts to make a bit of extra cash around the holidays. It’s hard to find anyone who does that anymore. There are so many wonder recipes using black walnuts…. and store bought just don’t taste the same to me. So give it a try!
Update 4/8/24: the walnuts were left in the cooler in plastic bags all winter with the bags unzipped slightly to keep the moisture inside but allow them to breath (the cooler was to keep the squirrels from taking them). I moved them into the greenhouse last month with the lid off the cooler to let them “warm up and sprout”. The bags of soil stayed mostly frozen all winter when I spot checked them. I checked them today and 4 of the butternut walnuts had sprouted so I transplanted those into pots! Yay! Waiting to see if any of the black walnuts or more of the butternut walnuts sprout. Time will tell…. these are slow growing trees but fun and free to experiment with. Something future generations can enjoy after they get transplanted into the landscape. But for now they will enjoy planter pots in the back yard. I often take edible nuts and try to propagate them. Last time was seeds from a paw paw tree fruit that I devoured lol. That tree is now doing good and I have it planted in the wood line with a tomato cage around it to keep the deer from trampling or eating it lol or from someone mowing over it by accident etc.
