
Lately it has been cold and rainy and during the summer we had hot and rainy… which means a need to control the humidity inside the RV. Humidity control is very important if you want to keep your RV in tip top condition and it’s even more important if you are very allergic to molds!
There are some simple easy ways to keep the humidity down but I’ve found a really nifty device that really works! More on that below but let’s review the more common methods first.
Air flow is key to humidity control so something as simple as running a small portable fan will help. Then there are things that take humidity out of the air. My dad uses a small bucket with charcoal briquettes in it which has the bonus of: if you need a few briquettes to start a campfire they are handy. This method does seem to work!
Another method is purchasing packets that remove moisture from the air that are disposable. They come in all shapes and sizes and they even make ones that hang inside closets where moisture often tends to accumulate. The only downside to these is the cost, since they are disposable and hence the need to replace them often. They also come in scented form… which due to my allergies and a dislike for scented products is another downside when the Unscented versions are not available in the local stores … and why my RV recently smelled like a baby’s butt due to the need to purchase closet hanging packets and we could only find them in “fresh scent” (a gag worthy smell in my personal opinion and even Conestoga Chuck was wary of the bedroom for several days due to the smell).
Which led me to looking for a more permanent replacement product. I dislike disposable products due to them landing in the land fill after a single use. So I wasn’t happy with the packets at all, and with all the rain … we needed a bit more dehumidifying than packets, fans, and charcoal could handle. So how does one know they have humidity problems in the RV?
Some signs to look for. Dampness on and around the windows and walls and cloth items (clothes and furniture etc) feeling damp. The best way is to monitor the humidity with an electronic indoor outdoor system. We have a wireless forecast station that can accept multiple wireless monitors. The main station monitors the indoor temperature and humidity levels. The external monitors (we use three) we place in the fresh water compartment, another one in the black/grey water compartment, and the third one in the refrigerator. This allows us to ensure the water and holding tank compartments don’t get down below freezing in winter. The one in the refrigerator allows us to monitor the temperatures and make sure the refrigerator is working properly so our food doesn’t spoil. This is an easy and economical way to manage both temperatures and humidity to prevent all kinds of different potential issues.
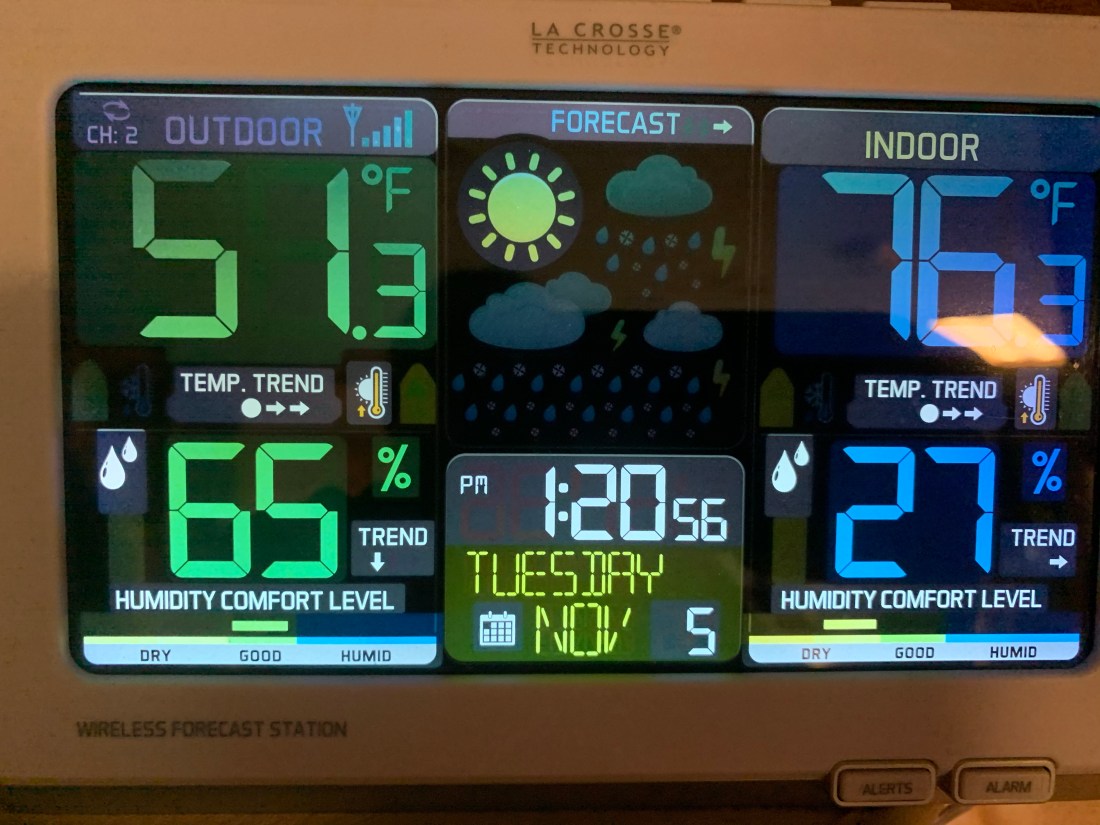
But back to humidity control. If you notice… our humidity levels are now at 27% inside the RV compared to 65% outside. Optimal indoor humidity should be no higher than 40%. Lower than 20% and you will start having problems with dry mouth and dry skin etc. So it is a fine balance that needs to be maintained.
During my research of replacement gadgets for humidity control my criteria for purchasing followed along with my normal purchasing rules. 1. Attempt to buy used prior to new if possible. This keeps the costs down and if the item doesn’t work out a donation to a local thrift store isn’t that costly. 2. Try and stay away from plastic and single use disposable products. Not only do single use items take up space that is not available when living in an RV, but it creates trash that needs to be dealt with. I stay away from plastic for personal reasons but plastics are not sturdy enough as a general rule for use in a traveling home on wheels where things shift and move as you are going down the road lol 3. Attempt to only purchase items that have multiple uses. Example a vintage corningware pie plate also serves as a dinner plate and a personal sized pizza pan etc and it can easily go from oven to fridge to freezer to microwave without any issue and is darn hard to break or chip. Not to mention they can be found in thrift stores lol.
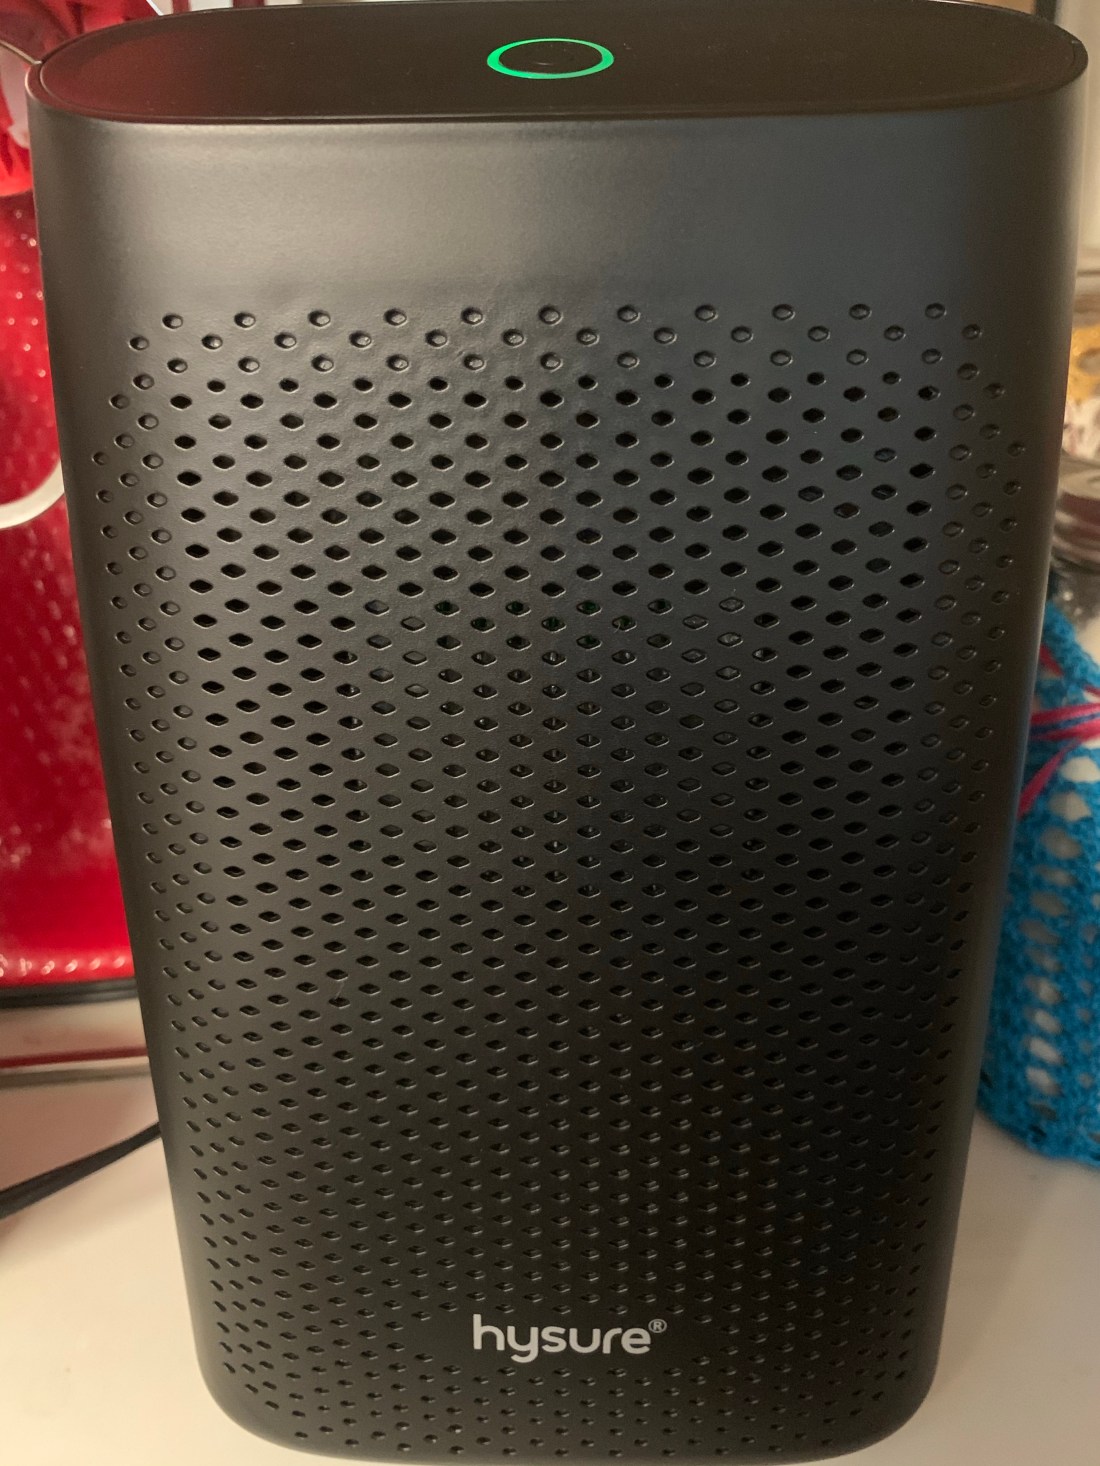
So …trying to stay within those purchasing parameters as best as possible, I ended up getting a hysure 700ml dehumidifier from Amazon. The cost was $39. The item is about the size of a small ceramic bathroom heater, so it fits well in the limited space of the RV. It had amazingly good reviews, and we will add to those reviews that the product works great! Hence the low humidity levels in the RV today. The combination of the fan circulating air plus the dehumidifying attributes does a bang up job in our 36 foot (with slide outs) coach! It is small but seems to work great! It’s really not much taller than a quart size mason jar (which you may be able to see on the right side of this photo although this photo makes the dehumidifier look a lot bigger than it actually is lol) so it sits on the countertop very nicely in the kitchen and it is a very slim design.
The last hint I have for humidity control is when cooking or showering or even doing laundry if you have an onboard washing machine… all these activities create steam and hence increase the humidity levels inside the RV. So open those ceiling vents and let the steam escape while doing those activities! It’s worth loosing a bit of heat or AC to get that steam out of the RV and prevent damage to walls and ceilings, cabinets etc not to mention damp clothing and bedding etc. in the summer we actually do most of the cooking in our instant pot on the “patio” to help keep the humidity down inside the RV. We also keep a portable ice maker on the “patio” to cool off our drinks while outside so we don’t have to go inside for ice which helps with both temperature control and humidity control inside the RV. Besides… it’s sorta fun to hang out on the patio and enjoy the scenery while cooking and enjoying an ice cold drink! Lol
